Sunday, April 22, 2012

Baked Sunday Mornings: Maple Cupcake with Maple Cream Cheese Frosting and Candied Bacon


Everything is good with bacon....right?  When I saw that the baked group was  making these maple cupcakes I  went out and bought some maple syrup from the Amish at the flea market and knew that I wanted to top them off with this candied bacon recipe that I have been itching to try!  I halved the recipe because we are just 3 in this household and 24 cupcakes are just way too many.  The cupcakes were light, moist and not overly sweet which is a good thing because the frosting is plenty sweet but soooo good!  I topped it off with toasted walnuts and my candied bacon....a perfect touch!


Look and see what the other bakers did and get the recipe here.  I will add the candied bacon recipe to this post.  

Enjoy!


Candied Bacon

source: Recipegirl.com

Yield: 12 slices of bacon
Prep Time: 15 min
Cook Time: 15 min
Addicting. Seriously.

Ingredients:

1/2 cup packed light brown sugar
1 teaspoon ground cinnamon
12 slices center-cut bacon (don't use extra-thick bacon)

Directions:

1. Preheat the oven to 350 degrees F. Line a rimmed baking sheet with foil and set a rack on top (like a cookie cooling rack). Spray the rack with nonstick spray.
2. Mix the sugar and cinnamon in a bowl. Dip bacon slices in the cinnamon-sugar, coating both sides, and place the coated bacon strips on the rack. I like to poke the bacon into the grooves of the rack in a few places so your bacon will come out looking a little wavy.
3. Bake 15 to 20 minutes, or until the bacon appears to be caramelized and somewhat crispy. Watch closely after 15 minutes since the sugar can begin to burn when left in too long. Serve immediately.


Sunday, April 15, 2012

Buttermilk Pie


I love old fashioned vintage recipes....when I go to flea markets I pick through all the vintage cookbooks that I can find and usually end up buying one of two of them.  Cookbooks and vintage bakeware are my weaknesses!  This pie is a traditional southern delicacy.  It comes out of the oven with a beautifully golden almost caramelized top and inside a light creamy custard like filling.  Don't be fooled!  Just because it is made with buttermilk there is nothing sour about this pie, but is not overly sweet and the buttermilk adds just a little tang.  It is quite delicious and goes together very easily without any fuss.  If you haven't tried a buttermilk pie...I highly recommend 
that you do!


Enjoy!


You can get the recipe I used here.

Sunday, April 8, 2012

Breakfast Tart with Pancetta and Green Onion


Happy Easter!
I made this tart for our Easter brunch.  The recipe didn't take too long it was very easy. I followed the recipe exactly...next time I think I will make my own crust.  It was very cheesy and tasty and enjoyed by all!  I loved the pancetta and green onion mix!! 

Enjoy!


Breakfast Tart with Pancetta and Green Onion
Food Network Magazine, April 2012

Butter, for pan
Flour, for the pan
1 9 inch unroll and bake refrigerated pie crust
1 large egg white, lightly beaten
2 teaspoons vegetable oil
3 ounces pancetta, cut into 1/4 inch pieces
5 large eggs, at room temperature
1/2 cup (4 ounces) shredded gruyere cheese
3 scallions, white and pale green parts, thinly sliced
1/2 teaspoon kosher salt
1/2 teaspoon freshly ground black pepper

  1. Place an oven rack in the center of the oven.  Preheat oven to 400 degrees.
  2. Butter and flour the bottom and sides of a 9 inch tart pan with a removable bottom.  Unroll the pie crust and gently press into the bottom and sides of the pan.  Trim any excess from the top.
  3. With the tines of a fork, prick the bottom of the pastry.  Using a pastry brush, brush the crust with the beaten egg white.  Put the pan on a baking sheet and bake for 10 minutes, until the egg white has set.  Let cool for 10 minutes.
  4. Meanwhile in medium skillet, heat the oil over medium-high heat.  Add the pancetta and cook, stirring frequently, for 6-8 minutes, until browned and crispy.  Drain on a paper towel lined plate.
  5. In a medium bowl, lightly beat the eggs.  Whisk in the mascarpone, gruyere, scallions, salt , pepper and the pancetta.  Pour into the cooled crust and bake for about 18 minutes, until the mixture has set and the top is golden.
  6. Cool the tart for 10 to 15 minutes and then remove from pan.  Cut the tart into the wedges and serve warm at room temperature.


Sunday, April 1, 2012

ABC: Buttery Pull-Apart Dinner Rolls


This month the Avid Bakers are baking up some hot buttery rolls.  There were 3 options as far as flavoring went...poppy seeds, herb, and pepper cheese.  I chose the herb.  I mixed the dough in my Kitchen Aid instead of doing it by hand.  The dough was very sticky and I really didn't get much of a rise out of them the first or second time.  But they were tasty all the same.  I should have only made half of the recipe because 16 rolls are far too many for 3 people.  I guess I will try and freeze the left overs. 


I gave it my best shot...better luck next time! :)

Go here to see what they really should look like.

If you would like the recipe you can find it here.

As Always,
Enjoy!

Sunday, March 25, 2012

Baked Sunday Mornings: Chocolate Coffee Cake with Dark Chocolate Ganache


I made 6 little cakes and topped them with cocoa nibs.  I followed the recipe exactly only I baked the cake in sheet pans and then cut them into rounds.


I had lots of cake left over so I made cake balls by crumbling up the leftover cake, mixing in the coffee buttercream then rolling them into balls and dipping them in the ganache!!  A nice little treat!


This chocolate cake if easy to make and very moist and delicious!  I think this will be my go-to chocolate cake recipe!

To see what the other talented bakers did click here

Enjoy!

Saturday, March 17, 2012

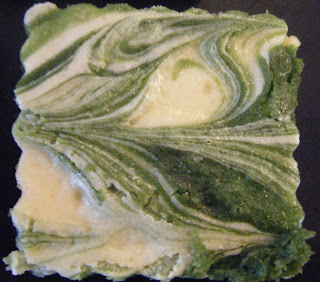
Green Velvet Cheesecake Bars


Happy St Paddy's Day!


 These were suppose to be cut into shamrock shapes but I didn't have a shamrock cookie cutter.  I thought I did!!  I just cut them into bars.  These taste just like red velvet only the color has been changed. 


Green Velvet Cheesecake Shamrocks

adapted from the novice chef


Yield: 16 shamrocks

Ingredients:

Green Velvet Layer:
2 cups flour
1 1/2 cup sugar
1 tablespoon cocoa powder
1/2 teaspoon salt
1/2 teaspoon baking powder
2 large eggs
2/3 cup vegetable oil
3 tablespoons milk, divided
2 teaspoons vanilla extract
1 teaspoon green food coloring
1 1/2 teaspoons white distilled vinegar

Cheesecake Layer:
12 oz (1 1/2 packages) cream cheese, softened
1/2 cup sugar
2 large eggs
1 1/2 teaspoons vanilla extract

Directions:

Preheat oven to 350 degrees. Grease a 10 x 15 jelly roll pan with butter or spray with Baker's Joy.
In large bowl, whisk together flour, sugar, cocoa powder, salt, and baking powder. Set aside. In a medium bowl, whisk together eggs, vegetable oil, 2 tablespoons milk, vanilla extract, green food coloring, and white vinegar.
Combine the dry and wet ingredients, until completely combined (the batter will be thick). Remove 1/2 cup of the batter and place it in a medium bowl. Whisk in the remaining 1 tablespoon of milk (into the 1/2 cup of batter you just took out). Set aside the 1/2 cup batter.
Pour the remaining batter into the prepared jelly roll pan. Using a spatula, smooth out the batter to reach all the edges.
Now, in your stand mixer, beat cream cheese and sugar until fluffy, about 2 minutes. Add eggs and vanilla, beating until combined and there are no lumps. Pour the cream cheese mixture on top of the green velvet layer and smooth mixture till it reaches all the edges.
Drop spoonfuls of the remaining red velvet batter (that you mixed with milk) onto the top of the cheesecake layer. Drag the tip of a knife through the green velvet and the cheesecake layers to create swirls.
Bake for 23-25 minutes, rotating half way through, or just until the center is set and it no longer jiggles. Let cool completely on a wire rack before cutting. Use a medium sized shamrock cookie cutter to create the perfect St Patty's Day treat!

Saturday, March 3, 2012

ABC: Emergency Blender Cupcakes


 This months Avid Bakers Challenge...Emergency Blender Cupcakes from The Weekend Baker by Abby Dodge. 
Easy Peasy! 
They came together in minutes. 


I had no problem blending them up in the blender and will do it again that way the next time I make them, but there certainly is no reason why you couldn't use a mixer. 


The cake was moist and had a nice chocolate flavor, the frosting was smooth, creamy and fudgy. If you need to make good cupcakes quick....this should be your go-to recipe!  You can get the recipe here.


They are delicious!
See what the other Avid Bakers did here
Enjoy!