Sunday, May 18, 2014

Gluten Free Peanut Butter Cookies


Today I have for you a gluten free peanut butter cookie. I used gluten free and almond flour and also used Earth Balance creamy peanut butter as well as Enjoy Life chocolate chips. I sweetened them with Truvia baking blend.
    These cookies are delicious!  
But be warned, even though I tried to make these healthier they are not low in calories!  The cookies spread with peanut butter and dipped in 
chocolate are truly a decadent treat!


Peanut Butter Cookies
adapted from Dieters Downfall
Ingredients
  • 2 cups gluten free flour
  • 1/2 cup almond flour
  • 1/2 teaspoon baking soda
  • 1/2 teaspoon baking powder
  • 1 teaspoon salt
  • 1 cup butter
  • 1 cup light brown sugar (7 oz)
  • 1/2 cup Truvia Baking Blend
  • 1 cup peanut butter
  • 2 eggs
  • 2 teaspoons vanilla extract
  • 1 cup dry roasted salted peanuts
Instructions
  • Preheat the oven to 350℉.
  • Chop the peanuts in a food processor until they are crumbled into little chunks.
  • Stir together the flour, baking soda, baking powder and salt.
  • Beat the butter in a mixer until light and smooth. Add in the sugars and blend for 3 minutes until smooth. Add in the peanut butter and blend until fully blended. Add in the eggs and vanilla and then add in the flour mixture and finally the peanut crumbles.
  • Measure out two tablespoon sized dough balls and place them on a cookie sheet lined with parchment or a silicon mat. Using a fork, make the crisscross pattern and bake for 10 - 12 minutes. The edges should start to turn brown, but remove them from the oven before the tops turn.
  • Let the cookies rest on the cookie sheet for 5 minutes before transferring them to cooling rack.
  • Once the cookies are cool, you can spread on some peanut butter and then dip them into chocolate....you know you wanna do it!

Until next time...
Enjoy!

Sunday, May 4, 2014

English Digestive Biscuits: ABC


I have missed baking along with the Avid Bakers!  This is my first time this year that I have baked along.  I have been trying to clean up my diet and lose weight since the beginning of the year and I don't bake unless I am baking for someone or I know that all the goods will be out of the house and enjoyed by someone else!  These cookies will go into the freezer and be
 used for a crust for Banoffee Pie at a later time :)


When I saw that Digestive Biscuits were next on the list I almost didn't bake them, but I do love vintage recipes and this is about as vintage as you can get!  These biscuits are actually cookies and they were developed in the 19th century during the Victorian era to aid in digestion. The other bakers have some really good history on their posts.  
Check them out if you would like to know more!  


These were really easy to make.  I modified a little by using Gluten Free four and adding some ground flax seed to the mix.  I also used brown sugar and almond milk.  So I kinda sorta healthified them!  I kept some naked and dipped the bottoms of some in chocolate then decorated the tops with lines (much like a favorite cookie of mine).


It was fun to be back!
For the recipe go to King Arthur Flour
and to see what the other bakers did go to 

Enjoy!

Lemon Macarons Filled With Lemon Buttercream and Lemon Curd

I have a fascination with macarons!  I love them and want to master baking them.  Every time I make them I get better.  These little lemon gems were my best attempt thus far!  My son's birthday is in May and he lives 2000 miles away so I never get to see him on his birthday so I wanted to send a little something to celebrate the day.  I know he loves lemon bars but I didn't want to make those thinking that they would not make the trip. 


I wanted to fill them with lemon buttercream as well as lemon curd, so I got busy and started to create these beautiful little lemony treats.


I got my almond meal and confectioners sugar ground to a powder and sifted.  Then beat my egg whites to stiff, glossy peaks, added in the lemon and vanilla extract then started to add in the almond/sugar mixture a little bit at a time.  Then the fun starts!  This is were you make it or break it!  You start to gently folding it over and over several times, mushing it against the side of the bowl as you go along.  This is called the "Macaronnage".  You have to get it to just the right consistency and you can't go too far or you have a real mess on your hands!  Then the batter is put in a pastry bag and piped onto a prepared cookie sheet and left to dry for about 30 minutes to an hour.  This helps your get the pretty little edge they call the feet. 


I am really happy with the way 
these turned out.  Some of them got a little 
bubble on top...not sure what caused that...will have to do some more research!  But all in all these macarons were very good!  A light crispiness on the outside and a nice chewy inside....just the way I like them! I wanted to fill them with a combo of buttercream and lemon curd so while the macarons were drying and baking I made my lemon curd and I must say....a beautiful lemon curd it was!  This will be my go to recipe from now on!


Beautiful...Yes????


I packed up these little lemon treats in a "Box of Sunshine" along with other yellow sunshiny things.  I hope it makes him smile!  


As always
Enjoy!


Click here for the macaron recipe.

Lemon Curd 

Ingredients:
5 Tbsp fresh lemon juice
4 Tbsp butter (1/2 stick)
3/4 cup granulated sugar
2 eggs
2 egg yolks
1 Tbsp grated lemon zest

Method:
In a steel bowl whisk together all the ingredients except the butter.
Bring a pot of water to a slow simmer and put the steel bowl on it whisking continuously (or it may curdle) until the mixture thickens, to coat the back of a spoon.  Take the bowl off the pan and add the butter and whisk until the butter melts and is incorporated.  Let cool and transfer to a clean jar, put plastic wrap on before closing the lid and refrigerate.

Lemon Buttercream

Ingredients:
1/4 cup unsalted butter, softened (1/2 stick)
1-2 cups confectioners sugar ( plus more if needed)
2-3 Tbsp of heavy cream
1 Tbsp lemon juice
2 tsp lemon zest
1/2 tsp clear vanilla extract
sprinkle of salt

Method
Beat the butter on medium high speed for 2 minutes with an electric mixer, fitted with the paddle attachment, until soft and fluffy.  Add the confectioners sugar, 1/2 cup at a time until combined and to the consistency that you want. Add lemon juice, zest, vanilla and salt, continue to beat for another 1-2 minutes. (Add up to 1/2 cup more sugar if too thin or a little more cream if too thick).

Assemble the Macarons
Match up your macarons into pairs place one face side up and pipe a circle of buttercream around the edge (leave a little room on the edge) of the macaron and place a dab of the lemon curd in the center.  Sandwich the halves together and gently push the filling to the edges.


Problem with the bubbles was caused from over beating the egg 
whites...will know next time!

Sunday, April 27, 2014

Classic Carrot Cake with Cinnamon Cream Cheese Frosting: Baked Sunday Mornings


The Baked Sunday Morning group is making carrot cake!  
This is your classic carrot sheet cake with toasted coconut and walnuts 
added.  I did something a little daring, I guess you could say....I used my carrot pulp from my morning carrot juice for the carrots in this recipe.  I guess it worked OK.  There weren't the normal visible bits of carrots like you normally have with carrot cake, but it tasted good.  The frosting was light and fluffy and I really liked the cinnamon added to it.  This was an Easter treat that my family loved!


I had a small piece and it was not my favorite carrot cake recipe 
but it was good. I think it needed some raisins or something.  I would still give it a thumbs up!


Take a look see at what the other bakers did here.
Get the recipe here.

As Always
Enjoy!

Sunday, April 20, 2014

Raspberry Almond Scones


Gotta love Easter brunch at my sister's house.  I always make scones.  These were a big hit! 


Raspberry Almond Scones

Yield: 8 scones
Prep Time: 10 minutes
Cook Time: 15-18 minutes
Total Time: 30 minutes

ingredients:
2 cups all-purpose flour
1 tablespoon baking powder
3 tablespoons granulated sugar
1/2 teaspoon salt
6 tablespoons cold, unsalted Land O Lakes® Butter, cut into 1/4-inch cubes
1 cup heavy cream, plus 1 tablespoon, divided
1/4 teaspoon almond extract
1/3 cup sliced almonds
1 cup raspberries

For the Almond Glaze:
1 cup powdered sugar
4-5 tablespoons heavy cream or milk
1/2 teaspoon almond extract
1/4 cup sliced almonds, for garnish


directions:

1. Preheat oven to 400 degrees F. Line a large baking sheet with parchment paper or a Silpat and set aside.

2. In a large bowl, whisk together flour, baking powder, sugar, and salt. Quickly cut in the butter, using your hands, two knives, or a pastry blender. Mix until mixture resembles coarse meal, with a feel larger butter lumps. Pour 1 cup of heavy cream and almond extract over the ingredients and stir with a spatula until dough begins to form. Don't over mix. Gently fold in sliced almonds and raspberries. The raspberries will get a little smashed, but that is ok. The scones will still be pretty:)

3. Transfer dough to a floured countertop and knead dough by hand just until it forms a ball. Form scones by patting the dough into a 3/4-inch thick circle. Cut the scones into even triangles. We got 8 scones.

4. Place scones on prepared baking sheet. Using a pastry brush, brush scones lightly with the additional heavy cream. Bake scones for 15-18 minutes, or until scones are light brown. Cool scones on a wire cooling rack.

5. While the scones are cooling, make the almond glaze. In a small bowl, whisk together powdered sugar, heavy cream or milk, and almond extract. Whisk until you reach desired consistency. Drizzle glaze over the scones. Top with additional sliced almonds. Serve!

Scones will keep in an air-tight container for up to 2-3 days, but they really are best eaten the day they are made.

This delicious recipe brought to you by Two Peas & Their Pod
http://www.twopeasandtheirpod.com/raspberry-almond-scones/

Thank you Two Peas & Their Pod!  Awesome Recipe!
As Always
Enjoy!


Sunday, April 13, 2014

Cinnamon Chocolate Soufflés


I have been so involved in eating healthy that I have been MIA with the Baked Sunday Mornings group.  I miss my baking but love the rewards that I have from living a healthy and clean eating lifestyle!  I have lost 40 pounds! And I feel amazing!  Yay me! I still have quite a ways to go but I feel that this time I can actually reach my fitness goals.  

While I know that baking will not help me achieve these goals it serves another purpose in my life.  One that I don't want to give up.  I just have to learn not to overdo.  So when I saw that these Cinnamon Chocolate Soufflés were next on the Baked schedule, I thought that I would give it a try.  Hey there isn't any flour involved a small amount of sugar and dark chocolate... good antioxidants...right?  Well anyway, I have never made a soufflé
and I love cinnamon and chocolate together so I thought that 
I would give it a try!


I halved the recipe and baked it for 8 minutes like the recipe said to do...they looked great when they came out of the oven.  I am not sure they were quite done as they were just slightly lava-like in the center when I spooned into it.  They were quite bitter...I think that maybe they needed more sugar? 


Well, it didn't stop me from eating the whole thing.  
Would I make them again?  No.  
Still was nice getting back into the swing of things with all my Baked buddies!

You can see how the others did here.
And get the recipe here.

As Always....
Enjoy!

Saturday, March 29, 2014

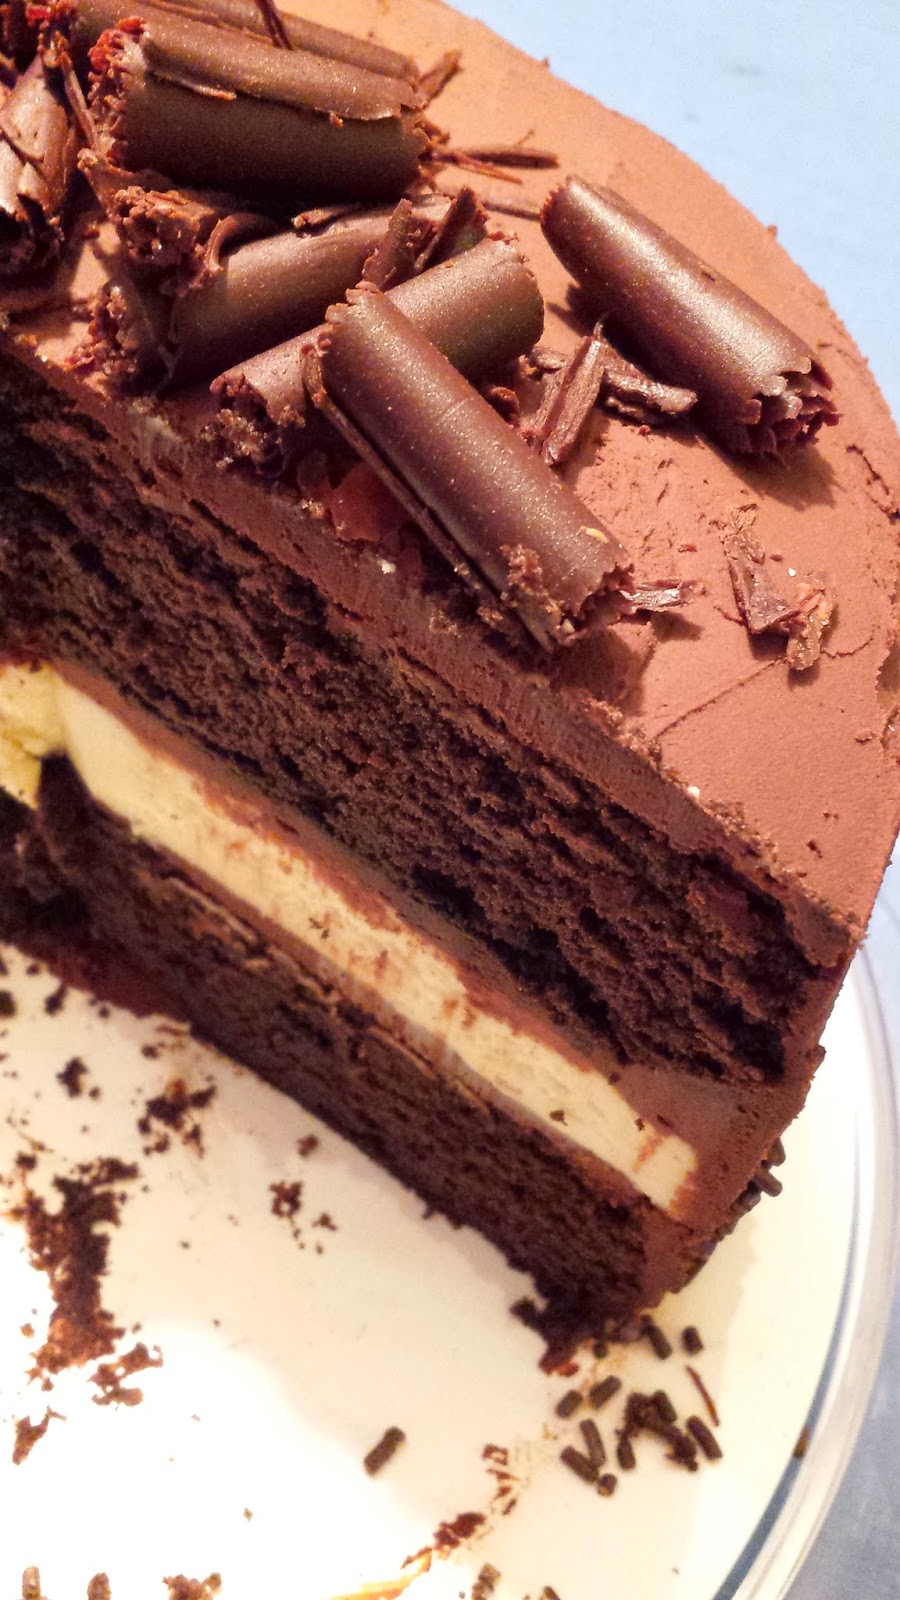
Death By Chocolate Cheesecake Cake


Appropriately named, this cake is outrageously decadent!  Not for the faint of heart...you have to be a hard core chocolate lover for this one!  Surprisingly easy to make but takes awhile to get it all put together.  The chocolate cake was extremely dense and rich, if I were to make this again I would use another chocolate cake recipe.  I loved the cheesecake layer and the frosting was delish!  This cake was my Mom's birthday cake.  She is 86 today! 


Death by Chocolate Cheesecake Cake
Adapted from Hot Polka Dot

INGREDIENTS

500 grams Philadelphia Brick Cream Cheese
1/4 cup granulated sugar
1/4 cup flour
1 vanilla bean
6 ounces white chocolate, melted and cooled
2 eggs
1 cup unsalted butter, room temperature
2 cups granulated sugar
1 vanilla bean
4 eggs
2 1/2 cups flour
1 cup cocoa powder
1 tablespoon baking powder
1/2 teaspoon salt
1 cup milk
1/4 cup vegetable oil
1 cup milk chocolate chips


DIRECTIONS

Preheat the oven to 325 degrees and position a rack in the center. Line a 9 inch spring form pan with a circle of parchment paper on the bottom and a ring around the edge. Wrap the outside of the pan with aluminum foil and place it in a shallow baking pan full of water that reaches halfway up the pan.

Split 1 vanilla bean lengthwise and scrape out the seeds. In a large bowl with an electric mixer, beat together the cream cheese, 1/4 cup sugar, 1/4 cup flour and vanilla seeds until combined well. Add the cooled white chocolate and mix well. Blend in the 2 eggs one at a time until just barely blended.

Pour it into the prepared pan and bake it for 30 to 45 minutes until the center is almost set but still a little jiggly. Turn the over off and let the cheesecake cool inside for an hour. Bring it out and let it cool to room temperature with an inverted plate on top. Let it set in the fridge for 4 hours or overnight.

Next make the chocolate cake. Preheat the oven to 350 degrees and position a rack in the center. Line two 9 inch cake pans with parchment paper and set them aside.

In a large bowl with an electric mixer cream together the 1 cup butter and 2 cups sugar until it's light and fluffy. Split 1 vanilla bean lengthwise and scrape out the seeds with the edge of your knife. Blend in the vanilla then the 4 eggs one at a time, mixing until each is incorporated.

Whisk together the 2 1/2 cups flour, cocoa powder baking powder and salt then add it in thirds alternating between the milk and oil. Lastly, mix in the chocolate chips.

Divide the batter between the prepared cake pans and bake them for 30 - 40 minutes until the tops are golden brown and a toothpick inserted into the middle comes out clean. Let them sit until they're cool enough to touch and flip them out on cooling racks to cool completely. Level off the cooled cake layers with a cake leveler or a long serrated knife.

While the cake cools make the sour cream chocolate frosting. 

To assemble the cake, place one layer of chocolate cake on you cake plate. Follow that with a generous layer of chocolate frosting. Place the set cheesecake on top then another layer of frosting and, finally, the other layer of chocolate cake. Ice the entire cake with the rest of the frosting. Enjoy!


Chocolate Sour Cream Frosting
Adapted from Deb Perelman's Best Birthday Cake at Smitten Kitchen, original recipe from The Dessert Bible 
Yield: 5 cups of frosting, enough to frost and fill a two layer 9-inch cake/three layer 8-inch cake 

15 ounces semisweet or bittersweet chocolate, chopped
1 1/4 teaspoons instant espresso (optional, but can be used to pick up the flavor of average chocolate)
2 1/4 cups sour cream, at room temperature
1/4 to 1/2 cup light corn syrup
3/4 teaspoon vanilla extract

Combine the chocolate and espresso powder, if using, in the top of a double-boiler or in a heatproof bowl over just simmering water. Stir until the chocolate is melted. You can also melt the chocolate in a microwave for 30 seconds, stirring well, then heating in 15 second increments, stirring between each, until the chocolate is melted. Remove from heat and let chocolate cool until tepid. Whisk together the sour cream, 1/4 cup of the corn syrup and vanilla extract until combined. 

Add the tepid chocolate slowly and stir quickly until the mixture is uniform. Taste for sweetness and if needed, add additional corn syrup in one tablespoon increments until the desired level of sweetness is achieved. Let cool in the refrigerator until the frosting is a spreadable consistency, for about 20-30 minutes. Should the frosting become too thick or stiff, just leave it out on the counter until it softens again before frosting. 


Happy Birthday Mom!